Easy-to-Install Shower Filter: Tool-Free Design Fits Most Shower Heads
Many homeowners want a shower filter to improve water quality but are discouraged by complicated installation or the need for wrenches. Using tools can be time-consuming and may damage showerhead connections. After installation, some filters may not even fit their showerhead. Tool-free shower filters solve these issues: they install by hand without extra tools, fit most showerheads, and even beginners can finish in 5 minutes. These filters are perfect for families looking to reduce chlorine and hard water problems without hassle.
Why Tool-Free Shower Filters Are Easy to Install
The ease of installation comes from optimized design and thoughtful details, simplifying the process for anyone.
1. Anti-Slip Grip and Effort-Saving Clips
Traditional filters often have smooth interfaces requiring wrenches. Tool-free designs improve usability with:
Anti-slip texture: Dense vertical or diagonal grooves increase friction, making it easy to grip even with wet hands.
Effort-saving clip: Some models have press-to-lock clips that snap into place when twisted slightly, signaling a secure fit without over-tightening.
For example, installing Aquabliss or Sprite tool-free filters only requires 3–5 hand turns, saving more than half the time compared to traditional filters.
2. Universal Connection Size: Compatible with Most Shower Heads
Compatibility issues are common, but most tool-free filters use a G1/2 interface:
Wide compatibility: Over 90% of home showerheads—including handheld, overhead, and fixed—use G1/2, so filters fit directly without adapters.
Material compatibility: Works with plastic, brass, or stainless-steel showerheads such as Jolie or Afina.
Avoid custom-only sizes: Filters with proprietary fittings only work with certain brands and require replacement when upgrading.
Tool-Free Shower Filter Installation: 5 Minutes for Beginners
Follow these four steps to install a tool-free shower filter safely and avoid leaks:
Step 1: Remove Old Shower Head and Clean Interface (1 Minute)
Turn off the main water valve. Hand unscrew the old showerhead. If tight, wrap with a cloth for extra grip. Wipe the pipe connection clean of mineral deposits to ensure a good seal.
Step 2: Wrap Teflon Tape for Seal (1 Minute)
Use 10–15 cm of Teflon tape on the filter’s lower interface:
Wrap evenly, 3–5 layers recommended; too thick prevents proper tightening, and too thin may leak.
Wrap clockwise to avoid loosening when twisting the filter.
Some filters come pre-wrapped with Teflon tape for convenience.
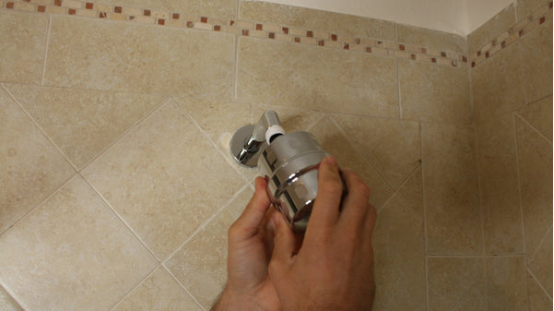
Step 3: Install Filter by Hand (2 Minutes)
Align the tape-wrapped interface with the wall pipe and twist clockwise:
Initial fit: Twist 3–4 turns until aligned.
Final secure fit: Continue twisting until slight resistance is felt. For clip models, twist until the clip engages. No tools needed.
Step 4: Reattach Shower Head and Test for Leaks (1 Minute)
Attach the showerhead to the upper filter interface, twist by hand, and then turn on the water.
Check for leaks. If minor seepage occurs, hand-tighten half a turn more.
Avoid wrenches; over-tightening may crack the filter interface.
For model recommendations and installation tutorials, visit the Shower Filter Product Page. The site lists filters by showerhead type with detailed instructions and images.
Three Key Considerations When Choosing a Tool-Free Shower Filter
Not all filters are created equal. Focus on these points to avoid installation issues:
1. Confirm Connection Type: Prefer G1/2 Universal Interface
Most tool-free filters are universal, but some are custom:
Check product pages for “G1/2 universal” or “fits most shower heads.”
Measure your showerhead diameter if unsure (G1/2 ≈ 20.95 mm).
Avoid niche interfaces with limited compatibility.
2. Check Seal Design: Double Sealing Reduces Leaks
Double seal: A silicone gasket plus Teflon tape ensures a strong, leak-proof connection.
Included Teflon tape: Prevents improper sealing and matches the filter interface.
Avoid filters without silicone gaskets; long-term use may cause leaks.
3. Filter Replacement: Choose Tool-Free Cartridge Changes
Tool-free replacement: Twist or press open the cartridge compartment, and replace the filter in under a minute.
Replacement indicators: Some filters have lights or tags to remind you when to change.
Avoid screw-fixed cartridges that require a screwdriver, which complicates maintenance.
For comparisons of interface compatibility, seal design, and maintenance ease, visit the Shower Filter Product Page. User reviews and specs make it easy to choose a reliable, hassle-free filter.
FAQs: Common Tool-Free Shower Filter Questions
Q: What if I can’t hand-tighten the filter fully? Will it leak?
A: Tool-free filters are designed to seal with slight resistance. Additional Teflon tape or a half-turn can fix minor seepage.
Q: Can I use a tool-free filter with a handheld showerhead?
A: Yes. Remove the hose, install the filter between the wall and hose, then reattach. No tools are needed.
Q: Is the filtering performance comparable to traditional models?
A: Yes. Tool-free design only simplifies installation. High-quality cartridges (activated carbon, KDF, and ceramic) and filtration precision remain the same, effectively removing chlorine, heavy metals, and limescale.
Tool-Free Shower Filters Make Water Quality Easy
For anyone wanting a shower filter without complicated installation, tool-free designs are a game-changer. Install by hand in 5 minutes, compatible with most showerheads, with no leaks or frustration. Focus on universal interface, double sealing, and tool-free cartridge replacement, and you can enjoy clean, filtered water effortlessly. Perfect for renters, beginners, or anyone who values convenience.